Wednesday, July 30, 2014

Epoxy Vs PL construction adhesive


Here is an example of where I think PL construction adhesive is superior to epoxy. Here is the stempost buried in a bed of PL.   It is sticky right away, can be squirted in via the tube, does not run, and hardens pretty quick.

There is anecdotal evidence that PL will, sometime in the future, just fail on you.  BAM.. Out of the blue.  Bluster from the old gaurd?  Perhaps, but there are times when epoxy or thickened epoxy are a better choice.  Just not here.
 Here is another example of a place that is better off having PL rather than epoxy.  This is the nose of the boat.  2 raLw naked pieces of plywood, coming together at the front of the boat, needing a good, sticky join.  PL gives you that.  In today's Duckworks, Dave Lucas references a guy who is proudly building a big boat and boasts of using only PL.
Look carefully here at the transom. See the left fillet?  Pretty smooth, all things considered, for a fillet.  But look at the right side.  If you could zoom down and look, you would see what a cluster F... that fillet is.  Probably could have been solved by better cleanup, but, when your doing alot of area, it can be alot.


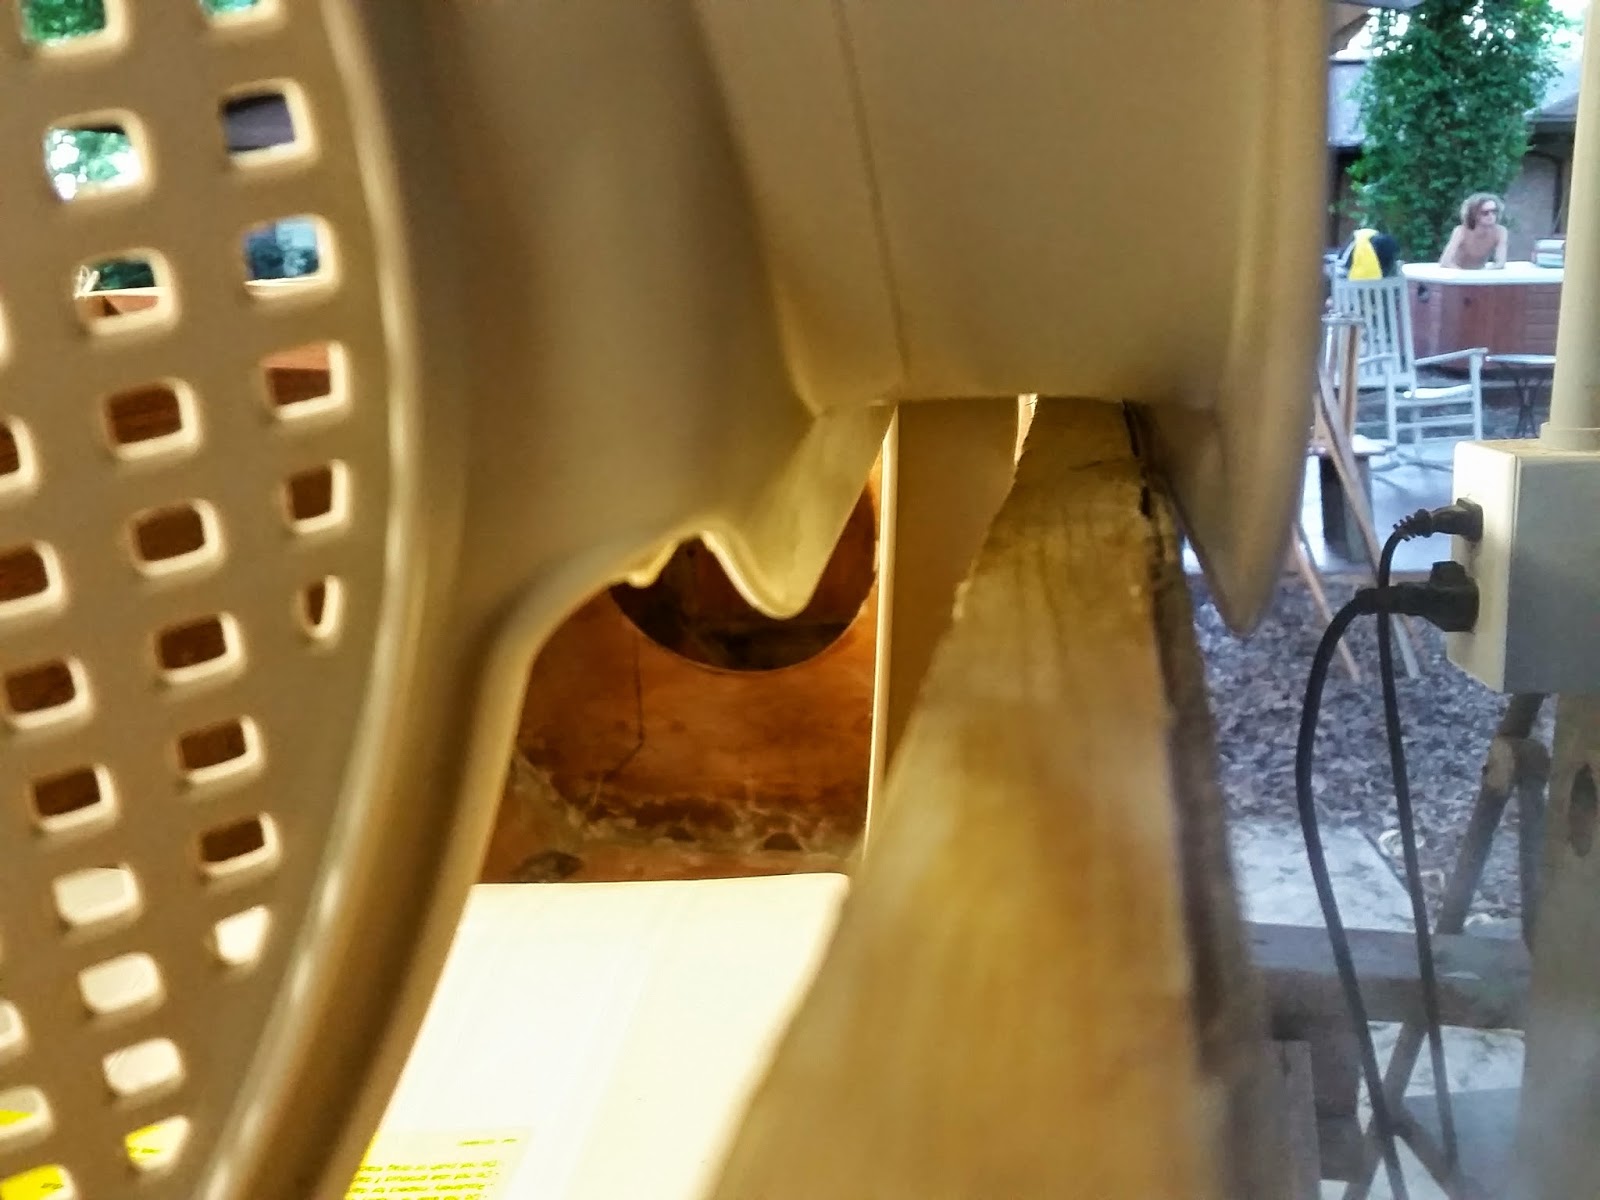
Ask yourself......What would you want to squirt in here.......PL, of course.


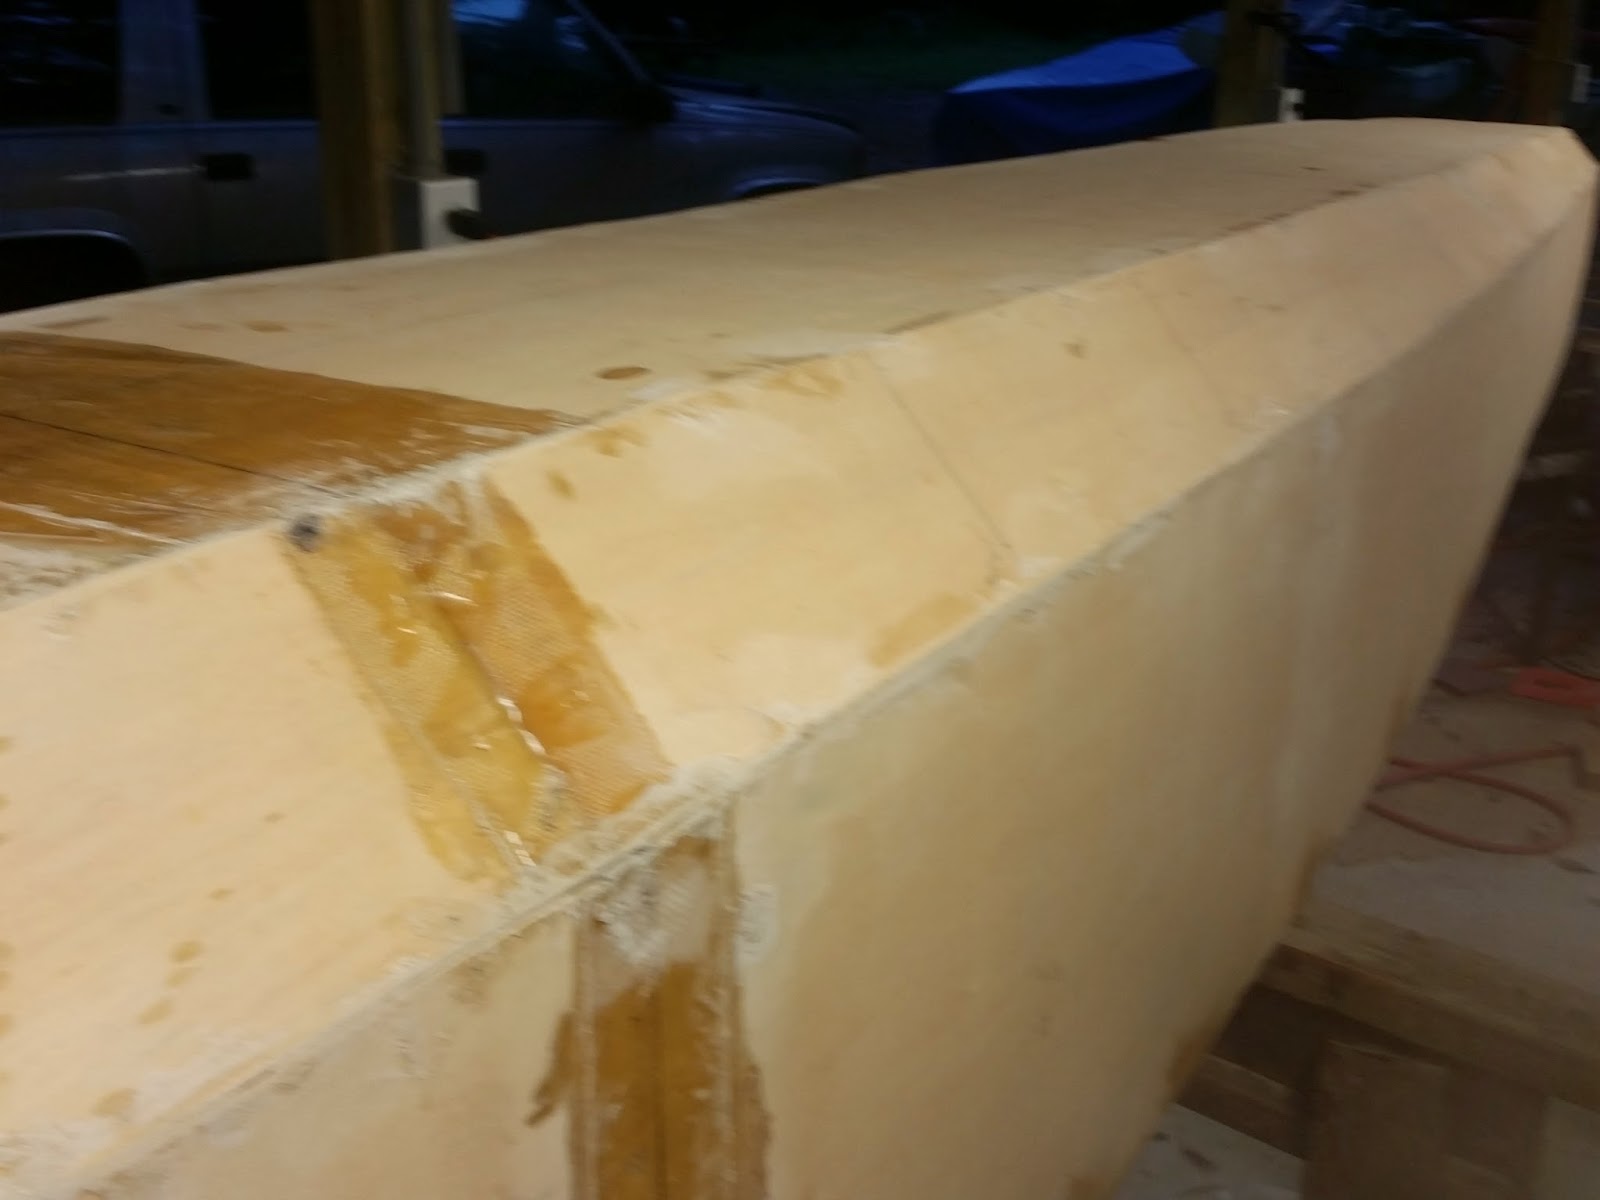
Loof the the left rail, where the chine meets the plywood.  See the gapage, where the glue somehow pulled away during drying?  Now, I could try the fill the voids with epoxy, but here, I think, I should have used epoxy....and clamps. Lots of them.  Maybe PL would have done the job, with more clamps.  As it was, I secured all along the ply/chine rail join, with air staples.  But, I think that was not enough.  It may well be that PL can be as good as epoxy, but both need clamping pressure for best results.  
Here is a clear example of the gets everywhere thing that PL does. This is an inside corner.  Still looks like that now, but can't be seen, because its.....an inside corner.  Can't be seen, but is also hard to take a chisel to.

Here is an example of where a chisel is the right tool for the right job.  See those hardened bits of hardened PL?  Those chisel of rather nicely.

This is just a random cool picutre of the almost 3 foot plane that was given to me by a 94 yr old retired carpenter. See that wood peeling up from the blade.  This is an action shot.


Here is a good shot of the wood shaper. Technically, it is a Rigid Oscillating edge belt/spindle sander.  I think it is way, way, way, way.. better than a belt sander. Except you can hold a belt sander up to a boat, can't do that with a wood shaper.


In conclusion.  epoxy is probably better for fillets, a tie for joining pieces, and where you need gobs of goo, PL wins.

Cockpit shear clamps additional wood added for tortional stiffness


Test fitting the additional wood for the shear clamp...No Glue yet


Thickened epoxy to glue the additional wood the the shear clamp...Yes...of course I pre wet both sides with epoxy first. No starved joints for me !!!  It is currently 96 degrees, so it should kick quick like.

More Cross Braces


These 2 photos show the angled crossbraces and a single crossbraces just in front of bulkhead #3.  I had a buddy who is a carpenter help me with all the other braces, but somehow we missed that one crossbrace.  So, last night, I had to cut that one......3 times.  I guess the old saying "third time is the charm" holds true.    That plus the angled cross braces.


Also, I cleaned the 2 eight foot tables.   Dang....cleaning sux !!!  Seems like it took an hour to clean and put away tools and screws and the epoxy glue up station.  I think I brought out every tool I own, at least it seemed that way when I was putting away all the crap.   Oh well.  Now I have room to make the amas.

Tuesday, July 29, 2014

Mounting theTHRONE


This chair has bravely volunteered to be my test subject.  Legs about to come off !!
 Legs chopped off.

Test fit in the boat.....Hitting the sides really tight....Not quite right yet

Let me notch it in a little..... Still not quite right...Dang..and hard to put into the boat!!
Here is the port side and the chair intersection. I almost want to cut off the vertical plastic part of the chair that is keeping the chair up off the railing.

Here is the starboard side. Seems to line up nicer towards the center of the armrest, where all my weight will be when sitting in this chair. Its kind of like the vertical plastic just to the right of the wood rail is part of the strength of the armrest. Very hesitant to trim that piece off. But if I do, both sides should rest on the center of the armrest.

Glassing the interior of the cockpit


By now, the interior seams have all had very wide thickened epoxy fillets, to help the fiberglass that will be laid throughout the interior and also to cover up the PL construction adhesive that was initially used as fillet material.  PL can be fickle stuff to work with.  I think it's highest and best use is when you need great globs of goo.  Thickened epoxy spreads out so much more nicely.
Here I show the 6 oz fiberglass cut to fit.  Interior has been sanded and vacuumed.

Here is a picture you don't often see.  That is because most people work alone and once you start spreading epoxy, you can't stop. I had to take my gloves off to get this shot. Anyway, as you can see, the epoxy is partially spread.

This is about 2 hours after it was all spread.  The epoxy has now dried so that it is still sticky but not fully cured.   See the texture of the weave showing.  Now is the time to spread on a second coat to fill the weave.


And here we are the next morning. See how shiny it is.  Like glass.  The boat is now tough, tough, tough.

Outside of hull ready for glassing....Almost

See how nicely the hull is coming together.  I have been using a chisel to get off the remaining PL construction adhesive


A view from midships... shows the side panel, the bilge panel and the bottom


 It's going to be one fast boat.

Adventures in building the Leeboard


This is a 1x12 Top Choice pine board.   If you look carefully, you can see the outline of the leeboard that will be cut out of this piece.  Some boats have a center board, some a daggerboard, and some have a leeboard.  It helps you go upwind.  Kind of a pivot point.

Curves cut, not on to shaping the leading and trailing edge into a foil shape, the way Rudders are shaped


Started rough shaping this with a Rigid brand oscillating edge/belt spindle sander, but stopped because I thought I was going to screw it up.  I had worked for quite some time on the boat and this was something like 9 pm.


Went over to a client's woodshop, and spoke to him and his shop foreman about getting the proper foil shape on the leeboard.  They both agreed that I should use a hand plane.  Here is what it looks like after just about 15 minutes of using the hand plane.

Sunday, July 27, 2014

Fillets and taped seams


All interior seams now have as much of the PL shaved off (mistake to go hog wild with PL) and then thickened epoxy laid down as fillets.  When they formed up and were still sticky, most seams got 6 inch tape wetted out and laid over the fillets.  All the interiors have at least one coat of epoxy to waterproof the plywood.  I would have just used the PL as fillets, but since I am planing on keeping the boat on mooring for days at a time, Frank said I should go with epoxy fillets (and taped seams..at least I think he said taped seams...seems pretty conservative and prudent)

Now, I have to make the leeboard and the rudder and associated pieces and parts.  If you should have any doubts as to why leeboards instead of daggerboards, see this.  http://www.diy-tris.com/2012/articles/1-leeboards-why.htm


When the interior dries, then the cockpit area will be completely covered in 6 oz cloth.  Currently, everything is still sticky.

stem reinforcing blocks


 Here is the larger of the 2 stem reinforcing blocks that help fortify the area where the bottom meets the nose of the boat.  2 separate boards, glued in with plenty of PL construction adhesive
Here you can see the smaller of the 2 blocks, in front of the bigger block. It is now glued in and it touches the vertical stem block, the sides of the boat and the bigger secondary reinforcing block

Saturday, July 26, 2014

PL construction adhesive vs Epoxy

The PL construction adhesive is messy stuff, but seems to dry as hard as epoxy.  I guess it can be used for Fillets, but you have to smooth it as soon as you run it, or else it forms a skin and trying to smooth it out after that creates a bubbly mess.  On the inside of my boat, I will be applying fiberglass cloth and need a smooth fillet.  Today, I will attempt to mix up some thickened epoxy to make a smooth fillet over the top of the bumpy PL fillet that I ran.

On the other hand, it sure is nice having the PL in a tube that can be squirted in between a side panel and a bulkhead, or between a chine rail and and a side panel.    Seems to last for a couple of days in an opened tube.

Thursday, July 24, 2014

Time to turn the boat over


I deviated from Frank's plans, which don't call for zipties, but did them anyway.

Here I show thin filets of PL construction adhesive, applied from the inside
  and wiped with a gloved finger.  Messy stuff, but much better than mixing epoxy

Sunday, July 20, 2014

A meeting of minds....so to speak


Had to take the belt sander to the stem block and get it ground down to the angle whereby the bilge panels come together. Now, I finally have the bottom and two bilges meeting in the middle, so to speak.

A meeting of bottom, bilge and side panels....Starting to look like a boat

 Had a little overlap on the bottom panel, shown above, going over the bilge panel, but I shaved some of that down
 Starting to look good here
 Side rear quarter view
Another good looking shot